Imprimir pdf en modo espejo en linux

Los driver de impresión compatibles con HP en linux, no tienen modo espejo (o mirror) para imprimir. Sólo tienen opción para hacer una impresión en orden inverso de las páginas.

La impresión en modo espejo, es necesaria si vamos a usar la tinta de nuestra impresora, para transferirla sobre otra superficie. La impresión deberá estar invertida, para que la transferencia sea legible.

OPCIÓN 1: En svg con inkscape

  1. En el canvas de inkscape, se seleccionan los textos a invertir, y con la herramienta selección > reflejo horizontal se invierten todos los elementos seleccionados.
  2. Imprimir el resultado.

OPCIÓN 2: En pdf con un editor de textos

Para conseguir una impresión invertida, el mecanismo es el siguiente:

  1. Crear el documento
  2. Guardar en pdf. Este pdf no estará invertido.
  3. Inventirlo mediante convert:
convert -flop archivo1.pdf archivo1_invertido.pdf

Despliegue Apache Hadoop sobre Debian

Despliegue de Apache hadoop sobre Debian con un nodo único.

Esta guía particulariza la instalación sobre un servidor Debian, actualizando las rutas y valores que en la guía original de Hadoop, es necesario cambiar para que funcione.

Instalación de paquetes previos

 sudo apt-get install -y ssh rsync

Instalación de los paquetes propios de Apache Hadoop 2.9 (versión estable:

wget http://apache.uvigo.es/hadoop/common/stable/hadoop-2.9.0.tar.gz ;
# Descomprimir:
tar -xvzf hadoop-2.9.0.tar.gz ;
# Moverlo a /usr/bin
sudo mv hadoop-2.9.0 /usr/bin/hadoop-2.9.0 ;
# Creo un enlace, para no tener que buscar las rutas:
sudo ln -s /usr/bin/hadoop-2.9.0/bin/hadoop /usr/bin/hadoop

Configuración del entorno

Cambiar en la configuración, la ruta donde tengamos en nuestro sistema java.

whereis java; 
medit /usr/bin/hadoop-2.9.0/etc/hadoop/hadoop-env.sh
# set to the root of your Java installation
 export JAVA_HOME=/usr/bin/java

Iniciar Hadoop

Al haber creado ya un enlace durante la instalación, es suficiente con invocar hadoop de la siguiente manera:

hadoop

Desinstalación

rm -rf /usr/bin/hadoop-2.9.0
rm -rf /usr/bin/hadoop

Más información: https://hadoop.apache.org/docs/r2.7.2/hadoop-project-dist/hadoop-common/SingleCluster.html

Editar pdf multipágina en linux / Debian con master pdf editor

Descarga de paquetes

Descarga de paquete .deb de Master PDf editor

Instalación a través de dpkg:

dpkg -i master-pdf-editor-4.3.10_qt5.amd64.deb

Dependencias:

Requiere tener una versión de librerías QT 5.4.1 o superior.

Getting started with gitlab

Installation for Debian 8

curl -sS https://packages.gitlab.com/install/repositories/gitlab/gitlab-ce/script.deb.sh | sudo bash
sudo apt-get install gitlab-ce

sudo gitlab-ctl reconfigure

https://about.gitlab.com/downloads/#debian8

Restarting gitlab

To restart web service

gitlab-ctl restart
ok: run: gitlab-workhorse: (pid 29291) 0s
ok: run: logrotate: (pid 29299) 1s
ok: run: nginx: (pid 29305) 0s
ok: run: postgresql: (pid 29313) 0s
ok: run: redis: (pid 29327) 1s
ok: run: sidekiq: (pid 29331) 0s
ok: run: unicorn: (pid 29336) 1s

Reconfigure gitlab settings

La configuración de gitlab se guarda en un archivo .yml, que se genera a través de :

emacs /etc/gitlab/gitlab.rb
sudo gitlab-ctl reconfigure

To locate configuration files in our system

find / -name gitlab.rb
find / -name gitlab.yml

Logging

Gitlab logs are separated in three files: application, sidekiq and production

tail -f /var/log/gitlab/gitlab-rails/production.log
tail -f /var/log/gitlab/gitlab-rails/application.log
tail -f /var/log/gitlab/gitlab-rails/sidekiq.log

Code highlighting

For highlighting source code, Gitlab uses Rouge module.

To know whether a language will be coloured or not, they have this awesome website where you can actually test colouring different code snippets.

Available grammars are in Github.

Installing Dataprotector 9 Agents on Debian 8

For some reason, dataprotector agents are released as an ISO image, with a +3000 lines shell script omnisetup.sh.

sudo ./omnisetup.sh -server myserver.myorg.es -install da

This lengthy script install dataprotector clients or server in several architectures:

  • osf1

  • hp-ux

  • SunOs and Solaris

  • AIX,

  • Linux x86, linux ia64

  • sco_sv

  • Darwin

  • PowerPC

For linux, it relays con rpm configuration. For Debian, the way to go would be alien.

Packages needed for Dataprotector agents (DA):

The only packages that are needed for the agents are:

  • OB2-TS-CORE-A.09.00-1.x86_64

  • OB2-CORE-A.09.00-1.x86_64

  • OB2-DA-A.09.00-1.x86_64

So, our first and naive aproach was a conversion with Alien and install them via dpkg -i.

for RPM in *.rpm; do sudo alien -c -k -d --fixperms $RPM; done

This led to an error as this three packages couldn’t be installed because we lacked some util called omnicc.

At this point, I tried running omnicc with bash -x, so that I could see what the long omnisetup was trying to do in my Debian machine.

bash -x ./omnisetup.sh -server myserver.myorg.es -install da

And then I noticed that, though only the above packages were installed, some others were uncompressed and used:

rpm2cpio /usr/local/share/Software_HP_DP_9.00_for_Linux_TD586-15021/linux_x86_64/DP_DEPOT/OB2-CORE-IS-A.09.00-1.x86_64.rpm 

cpio -id ./opt/omni/databases/utils/gpl/x86_64/linux-x86-64/utils.tar

cp ./opt/omni/databases/utils/gpl/x86_64/linux-x86-64/utils.tar .
(...)
rpm2cpio /usr/local/share/Software_HP_DP_9.00_for_Linux_TD586-15021/linux_x86_64/DP_DEPOT/OB2-TS-CFP-A.09.00-1.x86_64.rpm

cpio -id ./opt/omni/databases/vendor/ts_core/gpl/x86_64/linux-x86-64/A.09.00/packet.Z

PacketFullPath=/tmp/omni_tmp/opt/omni/databases/vendor/ts_core
/gpl/x86_64/linux-x86-64/A.09.00/packet.Z

(...)

rpm2cpio /usr/local/share/Software_HP_DP_9.00_for_Linux_TD586-15021/linux_x86_64/DP_DEPOT/OB2-DAP-A.09.00-1.x86_64.rpm

cpio -id ./opt/omni/databases/vendor/da/gpl/x86_64/linux-x86-64/A.09.00/packet.Z

PacketFullPath=/tmp/omni_tmp/opt/omni/databases/vendor/da/gpl/x86_64/linux-x86-64/A.09.00/packet.Z

(...)

At this point, I decided to stick to rpm installation, and use the omnisetup.sh script.

These are the files from the ISO image that we need to distribute to our Debian machines:

linux_x86_64 
│   ├── DP_DEPOT
│   │   ├── gpg-hpPublicKey.pub
│   │   ├── OB2-CFP-A.09.00-1.x86_64.rpm
│   │   ├── OB2-CORE-IS-A.09.00-1.x86_64.rpm
│   │   ├── OB2-DA-A.09.00-1.x86_64.rpm
│   │   ├── OB2-DAP-A.09.00-1.x86_64.rpm
│   │   ├── OB2-TS-CFP-A.09.00-1.x86_64.rpm
│   │   ├── OB2-TS-CORE-A.09.00-1.x86_64.rpm
│   │   └── OB2-TS-CS-A.09.00-1.x86_64.rpm
│   ├── scripts_linux_x86_64
│   │   ├── verify_gpg_lnx.sh
│   │   └── verify_gpg_lnx.sh.sig
│   └── SIG
│   └── DP_DEPOT
│   ├── OB2-CFP-A.09.00-1.x86_64.rpm.sig
│   ├── OB2-CORE-IS-A.09.00-1.x86_64.rpm.sig
│   ├── OB2-DA-A.09.00-1.x86_64.rpm.sig
│   ├── OB2-DAP-A.09.00-1.x86_64.rpm.sig
│   ├── OB2-TS-CFP-A.09.00-1.x86_64.rpm.sig
│   ├── OB2-TS-CORE-A.09.00-1.x86_64.rpm.sig
│   └── OB2-TS-CS-A.09.00-1.x86_64.rpm.sig
├── LOCAL_INSTALL
│   └── omnisetup.sh
├── Readme.txt

Manual installation:

apt-get install -y liblua5.1-0 xinetd rpm2cpio rpm 
sudo ./omnisetup.sh -server myserver.myorg.es -install da

Reconfigure xinetd to serve omni

cat /etc/xinetd.d/dataprotector 

omni stream tcp nowait root /opt/omni/lbin/inet inet -log /var/opt/omni/log/inet.log

Puppet installation

I am proud to present my own dataprotectoragent puppet module to avoid manual installation of this agent

puppet module install esterniclos-dataprotector agent

class {"dataprotectoragent":
      dataprotectorserver => "dataprotector.my.com",
    }

Available from

Troubleshooting

During this project, I encountered The package needs to be reinstalled, but I can’t find an archive for it error, and, luckily,  IhaveaPC awesome tutorial to get rid of it.

Using linux box to shrink and separate virtual disks

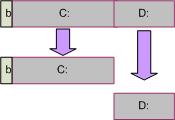
I have some virtual machines with partitions on their vmdk. This makes it terribly difficult to be resized.

I am going to use old dd linux command to copy all data.

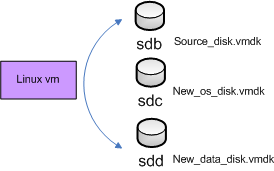
In the hipervisor, I’m using a linux box, actually Debian box, to map all disks, and do all the block writing commands.

vmware_shrink2

I also have to take care of the first blocks of the disks, which contains the booting mark. Otherwise, I will have a copy of my data, but my disk won’t be bootable.

vmware_shrink1

Let’s get started.

I will assign to my linux box, all my disks. Old and new ones.

OS disk: Writing boot sector

#
# Copy boot blocks and old partition tables
#
dd if=/dev/sdb of=/dev/sdc bs=16 count=200

OS disk: writing data

I have to re-do partition table (using fdisk) and then copy all data.

As I copied from the original source disk the first sector, a fake partition table is also writen on my new OS disk. It’s time to repartition.

fdisk /dev/sdc
Welcome to fdisk (util-linux 2.25.2).
Changes will remain in memory only, until you decide to write them.
Be careful before using the write command.
Command (m for help): p
Disk /dev/sdc: 15 GiB, 16106127360 bytes, 31457280 sectors
Units: sectors of 1 * 512 = 512 bytes
Sector size (logical/physical): 512 bytes / 512 bytes
I/O size (minimum/optimal): 512 bytes / 512 bytes
Disklabel type: dos
Disk identifier: 0xfe1387ed
Device Boot Start End Sectors Size Id Type
/dev/sdc1 * 63 31471334 31471272 15G 7 HPFS/NTFS/exFAT
/dev/sdc2 31471335 52452224 20980890 10G 7 HPFS/NTFS/exFAT

Delete second partition

Command (m for help): d 2
(...)
Command (m for help): p
(...)
Device Boot Start End Sectors Size Id Type
/dev/sdc1 * 63 31471334 31471272 15G 7 HPFS/NTFS/exFAT
(...)
Command (m for help): w
The partition table has been altered.
Calling ioctl() to re-read partition table.
Syncing disks.

To write the data, the dd command has to be invoked partitions name (sdb1) and not entire disk (sdb). Entire disk was used just for the boot mark.

dd if=/dev/sdb1 of=/dev/sdc1

Data disk: writing data

I have 2 options here. As it is data, I can either write blocks (dd) or just ordinary file copying.

I created the partition table.

fdisk /dev/sdd

Command (m for help): t
Selected partition 1
Hex code (type L to list all codes): 7
Changed type of partition 'HPFS/NTFS/exFAT' to 'HPFS/NTFS/exFAT'.

Command (m for help): p
Disk /dev/sdd: 10 GiB, 10737418240 bytes, 20971520 sectors
Units: sectors of 1 * 512 = 512 bytes
Sector size (logical/physical): 512 bytes / 512 bytes
I/O size (minimum/optimal): 512 bytes / 512 bytes
Disklabel type: dos
Disk identifier: 0x00c7e39c
Device Boot Start End Sectors Size Id Type
/dev/sdd1 2048 20971519 20969472 10G 7 HPFS/NTFS/exFAT

Command (m for help): w
The partition table has been altered.
Calling ioctl() to re-read partition table.
Syncing disks.

If we are going to use file system operations, I need to give it ntfs format:

apt-get install ntfs-3g
mkfs.ntfs /dev/sdd1

Now, it is time to mount both partitions and copy!

mkdir /mnt/old_data
mkdir /mnt/new_data
mount /dev/sdb2 /mnt/old_data/
mount /dev/sdd1 /mnt/new_data/
cp -rfp /mnt/old_data/* /mnt/new_data/

If ntfs permissions are not correctly written, you can use again old dd:

dd if=/dev/sdb2 of=/dev/sdd1

Impresoras HP en Debian 8.2

Para instalar nuestra impresora HP sobre un sistema operativo debian, necesitamos los siguientes paquetes:

apt-get install cups hplip

En este caso, vamos a instalar una impresora wireless: hp 3055.

En el gestor de impresoras de X, tenemos que crear la configuración de la impresora.

system-config-printer

En gnome también aparece escribiendo en el panel de búsqueda: "Impresora"

Impresora > Añadir Impresora > Añadir IP


Debian 8: Compilar nspluginwrapper

Compilar nspluginwrapper en debian 8, ha sido todo un reto. No suelo compilar paquetes, por lo que me faltaban casi todas las librerías de desarrollo.

Descarga del paquete nsplugin wrapper.  La última versión es del año 2011, lo que inquieta un poco, la verdad.

En el equipo ideal, esto funciona a la primera.

$ ./configure
$ make
# make install

Estos son los errores sucesivos que he ido encontrando yo en ,/configure:

Glibc environment not found

GTK+ environment not found

cURL environment not found

X11/Xt environment not found

apt-get install libglib2.0-dev
apt-get install  libgtk2.0-dev libcurl4-gnutls-dev libxt-dev

Resueltos los errores de paquetes, comenzamos con los errores de compilación:

/usr/include/features.h:374:25: fatal error: sys/cdefs.h: No existe el fichero o el directorio

Seguimos instalando

apt-get install libc6-dev-amd64

Y otro

/usr/include/c++/4.9/new:39:28: fatal error: bits/c++config.h: No existe el fichero o el directorio 

En este caso, el fichero está en n copias a lo largo del sistema

find /usr -name c++config.h
 
/usr/share/gccxml-0.9/GCC/4.8/bits/c++config.h
/usr/share/gccxml-0.9/GCC/4.7/bits/c++config.h
/usr/share/gccxml-0.9/GCC/4.6/bits/c++config.h
/usr/share/gccxml-0.9/GCC/4.4/bits/c++config.h
/usr/share/gccxml-0.9/GCC/4.9/bits/c++config.h
/usr/include/x86_64-linux-gnu/c++/4.9/bits/c++config.h

Tenemos G++ en versión 4.9

g++ --version
g++ (Debian 4.9.2-10) 4.9.2

Añadimos la ruta a la variable de entorno de G++

export CPLUS_INCLUDE_PATH=$CPLUS_INCLUDE_PATH:/usr/include/x86_64-linux-gnu/c++/4.9/

Tampoco se puede encontrar lsupc++

/usr/bin/ld: no se puede encontrar -lsupc++

Instalamos las librerías standard de C para nuestra versión de g++

apt-get install lib32stdc++-4.9-dev

Fallo al enlazar con nppplayer:

/usr/bin/ld: npplayer-npw-player.o: referencia sin definir al símbolo 'g_thread_init'

Se añade en Makefile el flag para lgthread-2.0

npplayer_LIBS    += $(libpthread_LIBS) $(libsocket_LIBS) -ldl -lgthread-2.0

¡Por fin pasamos el make!

Último paso, y ya tenemos ndiswrapper disponible en nuestro sistema.

make install


Puppet: Argumentos erroneos, error en ruby

puppet labs

El agente de puppet no hace gestión de argumentos de entrada. En el caso de ser erróneo, da el siguiente error:

root@puppettest1:~# puppet agent ..server myserver  ..no-daemonize ..verbose ..waitforcert=60
dnsdomainname: Name or service not known
/usr/lib/ruby/vendor_ruby/puppet/application/agent.rb:54:in `handle_serve': uninitialized constant Puppet::Network::Handler (NameError)
        from /usr/lib/ruby/vendor_ruby/puppet/application.rb:363:in `send'
        from /usr/lib/ruby/vendor_ruby/puppet/application.rb:363:in `parse_options'
        from /usr/lib/ruby/1.8/optparse.rb:1298:in `call'
        from /usr/lib/ruby/1.8/optparse.rb:1298:in `parse_in_order'
        from /usr/lib/ruby/1.8/optparse.rb:1254:in `catch'
        from /usr/lib/ruby/1.8/optparse.rb:1254:in `parse_in_order'
        from /usr/lib/ruby/1.8/optparse.rb:1248:in `order!'
        from /usr/lib/ruby/1.8/optparse.rb:1339:in `permute!'
        from /usr/lib/ruby/1.8/optparse.rb:1360:in `parse!'
        from /usr/lib/ruby/vendor_ruby/puppet/application.rb:370:in `parse_options'
        from /usr/lib/ruby/vendor_ruby/puppet/application.rb:305:in `run'
        from /usr/lib/ruby/vendor_ruby/puppet/application.rb:416:in `hook'
        from /usr/lib/ruby/vendor_ruby/puppet/application.rb:305:in `run'
        from /usr/lib/ruby/vendor_ruby/puppet/application.rb:407:in `exit_on_fail'
        from /usr/lib/ruby/vendor_ruby/puppet/application.rb:305:in `run'
        from /usr/lib/ruby/vendor_ruby/puppet/util/command_line.rb:69:in `execute'
        from /usr/bin/puppet:4

En versiones anteriores como 2.6, se requería añadir a mano en lib/puppet/application/agent.rb la línea

 require 'puppet/network/handler'

Para saber qué versión de puppet se está ejecutando

puppet agent --version

En version 2.7, hay que revisar los argumentos de entrada. En nuestro caso, al cortar y pegar, se habían sustituido los — por ..

Puppet: Cambiar certificados de cliente puppet o puppetmaster

En uno de nuestros nodos, tenemos el siguiente mensaje:

err: Could not retrieve catalog from remote server: SSL_connect returned=1 errno=0 state=SSLv3 read server certificate B: certificate verify failed: [certificate signature failure for /CN=]
notice: Using cached catalog
err: Could not retrieve catalog; skipping run
err: Could not send report: SSL_connect returned=1 errno=0 state=SSLv3 read server certificate B: certificate verify failed: [certificate signature failure for /CN=

CASO 1: El certificado erróneo es el del cliente:

En el cliente

Parar el servicio puppet:

service puppet stop

Los certificados, en el nodo, se pueden borrar

find /var/lib/puppet/ssl -name '*.pem' -exec rm {} \;

Antes del siguiente inicio de servicio en puppet, hay que borrar en el servidor su certificado

 En servidor:

puppet cert clean node
service puppetmaster restart
service apache2 restart

CASO  2: El problema está en el certificado del servidor.

Desde el cliente, vamos a hacer una prueba de conexión SSL:

wget https://puppetserver:8140/ --no-proxy
--2014-12-17 12:38:53--  https://mypuppetserver.com:8140/
Resolviendo mypuppetserver.com (mypuppetserver.com)... 10.57.236.13
Conectando con mypuppetserver.com (mypuppetserver.com)[10.57.236.13]:8140... conectado.
ERROR: El certificado de âmypuppetserver.comâ
                                                        ERROR: El certificado de âmypuppetserver.comâ

En el servidor, buscamos qué certificado está usando el servidor apache, para las conexiones por el puerto 8140

grep .pem /etc/apache2/sites-enabled/puppetmaster
        SSLCertificateFile      /var/lib/puppet/ssl/certs/mypuppetserver.com.pem
        SSLCertificateKeyFile   /var/lib/puppet/ssl/private_keys/mypuppetserver.com.pem
        SSLCertificateChainFile /var/lib/puppet/ssl/certs/ca.pem
        SSLCACertificateFile    /var/lib/puppet/ssl/certs/ca.pem
        SSLCARevocationFile     /var/lib/puppet/ssl/ca/ca_crl.pem

Para ver el contenido en texto de cada uno de los certificados

openssl x509 -text -noout -in  /var/lib/puppet/ssl/certs/mypuppetserver.com.pem

En nuestro caso, el problema es que los clientes, quieren que el certificado también esté disponible para el CN=puppet. En el certificado anterior, no estaba de nombre alternativo puppet.

Lo hemos resuelto cambiando el /etc/hosts en servidor, ligando también el nombre puppet a nuestro servidor, y recreando los certificados.

Aunque estamos seguros de que hay mejores formas de regenerar los certificados, tras 1 semana de depuración, los hemos regenerado purgando todos los paquetes de puppet y reinstalando el servidor:

cp -rfp /etc/puppet ~/puppet$(date -I)
apt-get purge puppetmaster puppetmaster-common puppetmaster-passenger
apt-get puppetmaster-passenger
apt-get purge puppetmaster